
Shellac- A Traditional Finish Still Yields Superb Results
Posted by Jewitthome on May 8, 2000 in Articles | Comments Off on Shellac- A Traditional Finish Still Yields Superb ResultsCopyright 2000 by Jeff Jewitt. Not reproducible in any form, written or electronic, without permission
To the average person, shellac probably invokes many negative perceptions. Poor water and heat resistance, difficult to apply, poor drying and low durability are all criticisms that I hear when I mention shellac to my clients or other woodworkers. While some of these criticisms are valid, many are not grounded in fact and are easy to disprove. Other negative aspects are overcome by using proper tools, techniques, and most important — proper product.
To experienced finishers and restorers of fine furniture the world over, shellac remains the finish of choice. One of the most elegant finishes for furniture, French Polish, is done with shellac. Conservators and restorers of antiques use shellac for re-finishing antiques. And most importantly, its low toxicity makes it a perfect choice for items that come into contact with food or children’s toys. There are countless other advantages to using shellac that are listed in at the end of the article. But as with every finish option available, there are disadvantages and these are listed also.
History
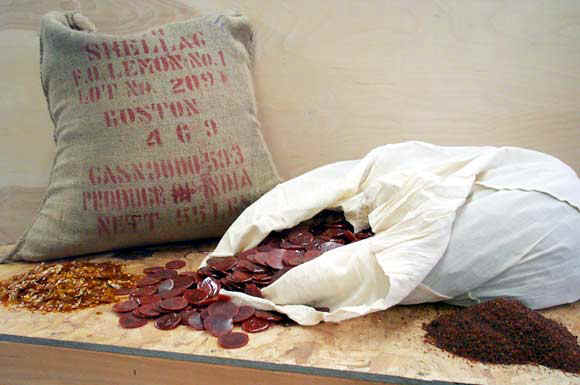
Most people have no idea of what shellac is or where it comes from. Shellac is a natural, organic resin that comes from an insect, Laccifera lacca, that is about the size of an apple seed. This bug alights on certain trees indigenous to India and Thailand and during its reproductive cycle feeds on the sap that it sucks from the twigs of these trees. The bug secretes an amber colored resinous substance that is called “lac”, a word that comes from the Sanskrit “lakh” which means one-hundred thousand. The resin forms a cocoon around the insect which serves to incubate the eggs she lays. This cocoon is the raw material for shellac and is called “sticklac”, because it contains resin, parts of the twig and bug remains. The sticklac is scraped off the tree by hand, washed and then refined either chemically or by hand, to produce the raw material available for sale to commerce.
The original cultivation of shellac was not for the resin, but rather, for the dye that gives the resin its characteristic color. The use of lac dye can be traced back to 250 AD when it was mentioned by Claudius Aelianus, a Roman writer in a volume on natural history. The lac dye was removed by the initial washing of the shellac resin in large kettles, which is also the first step in preparing the resin. This dye remained a valuable commodity until the mid-1800’s, when Perkins, an English chemist, synthesized the first chemical ‘aniline’ dyes which killed the natural dye industry. Fortunately the use of the resin had been firmly established, so the loss of the use of the dye had little impact on shellac trade. The first use of shellac as a protective coating appears as early as 1590 in a work by an English writer who was sent to India to observe the country and its people. Commenting on a procedure for applying lac to wood still on the lathe he writes “they take a peece of Lac of what colour they will, and as they turne it when it commeth to his fashion they spread the Lac upon the whole peece of woode which presently, with the heat of the turning (melteth the waxe) so that it entreth into the crestes and cleaveth unto it, about the thicknesse of a man’s naile: then they burnish it (over) with a broad straw or dry Rushes so (cunningly) that all the woode is covered withall, and it shineth like glasse, most pleasant to behold, and continueth as long as the woode being well looked unto: in this sort they cover all kinde of household stuffe in India”.* ( It’s interesting that many wood turners still finish this same way today.) * From “Shellac; its production, manufacture, chemistry analysis, commerce and uses.” London, Sir I. Pitman & Sons, ltd., 1935 pg. 3.
The use of shellac as a furniture finish never caught on in the West until the early 1800’s and it eventually replaced wax and oil finishes. It remained the most widely used protective finish for wood until the 1920’s and 30’s when it was replaced by nitrocellulose lacquer.
Shellacs other uses
The most fascinating uses of shellac have nothing to do with finishes. Because of its specific characteristics, it has a wide variety of uses, most of which continue to this day. According to the Zinsser Company, which is the largest supplier of shellac in this country, the top four uses for the dry shellac flakes are pharmaceutical, confectionery, hats, and food coatings, in order from highest to lowest. Protective coatings for wood ranks about number eight.
Pharmaceutical – shellac is used to coat enteric pills so that they do not dissolve in the stomach, but in the lower intestine, which alleviates upset stomachs. Its also used as a coating on pills to “time release” medication.
Confectionery – shellac is used to provide protective candy coatings or glazes on candy like jelly beans, because of its unique ability to provide a high gloss in relatively thin coatings (like a French Polish). It is approved by the FDA as a food safe coating when dissolved in pure ethanol (not denatured). Shellac in this form is called confectioners glaze.
Food Coatings – because of its FDA approval, shellac is used to coat apples and other fruits to make them shinier. It’s also used as a moisture barrier to coat the inside of ice cream cones.
Electrical – shellac mixed with marble dust is used by lamp manufacturers to glue the metal base to glass incandescent bulbs.
Other uses for shellac are in the manufacture of grinding wheels (it allows the abrasive particles to break off at the low heat generated by the grinding process, thus exposing new, fresh abrasive particles), leather finishing and painting (shellac pigmented with white titanium dioxide is widely used by painters as a stain sealer, wallboard primer, and knot and sap sealer on wood).
The demise of shellac’s many uses was brought about by the emergence of more durable synthetic resins such as Bakelite, cellulose nitrate, acrylics and urethanes. However, as mentioned above, it still finds a wide variety of applications in our society. It’s interesting to note that many attempts in the early part of this century were made to duplicate the shellac resin. Despite the attempts by scientists to duplicate shellac synthetically, a little Indian bug still makes it best.
The Many Varieties Of Shellac
Most woodworkers think of shellac as a liquid bought at a paint store. What many do not realize is that shellac is traded and sold as dry flakes. Those who have used shellac from a paint store probably used a type known as #1 Orange, which is the most commonly traded flake used as a wood finish. This is but one of the many grades of shellac available and it is dissolved in ethanol which is the most widely used solvent for shellac. The many varieties of shellac resin differ primarily in color as well as properties. The type of tree, climate conditions, the region where harvested, and the time of year harvested all play a role in determining the different colors and grades of shellac.
There are 4 crops which form the bulk of the shellac harvest, which takes place during the Spring, Summer, Fall and Winter. The two major ones are known as the Kusmi and Bysacki crops, which produce slightly different colored shellacs. The name may or may not appear in the final name of the product, but within the industry, the raw forms of shellac are identified as Bysacki or Kusmi. The trees that are host to the bugs are different, the Kusmi being the kusum tree and the Bysacki from other trees. The most basic form of shellac is called seedlac, which is sticklac that has been washed to remove some of the red dye and foreign matter such as twigs and such. From seedlac we get all the other types of shellac. The least expensive grade of shellac is traded as TN which stands for “truly native” in this country. This type of shellac is processed from the raw sticklac by hand in India. Other grades of shellac which can be considered intermediates are #1 Lemon or Lemon-Orange all of which naturally contain wax. When seedlac is processed by hand in front of a hot fire using cloth sieves, the molten resin drips onto cooling stones and forms what is called buttonlac. Seedlac is also further refined by chemical bleaching and wax removal to produce the white-shellac sometimes still sold in paint stores. The dry flake form of this product is called “bone-dry” shellac flake and is widely used in applications where the natural orange color of shellac would be undesirable (such as hats). Other seedlacs are de-colorized (by charcoal filtering) and de-waxed into the various colors of dewaxed shellacs sold under a variety of names like pale, blonde or super-blonde.
The shellac industry grades shellac by many variables, but the two most common are wax content and color. The most expensive shellacs have virtually no wax content (less than 1%) and a high color number 70-80. The lower grades of shellac — TN, orange lemon and buttonlac — have a wax content from 3%-5 % and color numbers of 20 or lower.
Mail-order companies that sell dry shellac flakes classify it according to color (pale, dark, white, Super-blonde) and sometimes by grade (#1 Orange, Button-lac, Seedlac, etc.). Other characteristics to consider is whether it has been de-waxed. Dewaxed shellacs have much better transparency and moisture resistance. (The wax in the shellac reduces the clarity of the finish and also reduces the molecular weight of the shellac resin, making it less resistant to water). On the downside, dewaxed shellacs have a much shorter shelf life after mixing with alcohol (less than 6 months).
Once the dry flakes are dissolved in ethanol, a chemical process known as esterification begins. What happens is that the alcohol starts to chemically modify the hard shellac resins and ultimately turns them into a sticky gum which doesn’t dry. This is responsible for one of the most often heard complaints about shellac — that it won’t dry. Large manufacturers such as Zinsser have started to label their cans with a shelf life date (three years), but for the best results and working properties, you achieve better results if you prepare your own shellac from dry flakes.
Dry shellac flakes store indefinitely under proper conditions, but contrary to what you may hear, it won’t store forever. Given enough time, especially under hot, wet conditions, dry shellac reacts with itself to form polymers that are insoluble in alcohol. Shellacs that have been dewaxed are more prone to this. You can extend the usable life of dry shellac flakes by storing them after purchase in a cool, dry area — a refrigerator is best. A test for suspected old shellac is easy — simply dissolve the flakes in alcohol. Most shellacs should be totally dissolved within three days. If you see a gelatinous mass after this time, the shellac is past its usable life and should be discarded (don’t confuse natural wax with this). If you just purchased it, return it to the company you bought it from. Sometimes in summer months, shellac will cake together. This is known in the industry as “blocking” and is not a sign of bad shellac. Break up the shellac with a hammer and dissolve it in alcohol as usual.
Dissolve dry shellac flakes in denatured ethanol, which is sold in most paint stores. It also dissolves in methanol, butyl and isopropyl alcohol. Methanol will evaporate the quickest, followed by ethanol, butyl and isopropyl alcohol. The last two alcohols, butyl and isopropyl can be added to shellac dissolved in ethanol in small amounts to act as retarders, which make the shellac stay wet longer for better application (like brushing). Lacquer retarder can also be used. I do not recommend using methanol as a solvent because it is very toxic. In some older finishing books, methanol is referred to as wood alcohol or methylated spirits, but its use is discouraged.
Once dissolved in alcohol, shellac eventually esterifies as mentioned above. Although I have successfully used 12 month old shellac, shellacs older than 6 months should be tested. Pour a small amount onto a piece of glass. If not dry to the touch within 15 minutes, it should be discarded. For this reason, it’s a good idea to make up only enough shellac to use within a six-month period.
Making the Cut
The ratio of dry shellac flakes dissolved in alcohol is known as the cut. It refers to the amount in pounds of dry shellac flakes dissolved in 1 gallon of alcohol. A 3 lb. cut would be 3 pounds of shellac dissolved in 1 gallon of alcohol. A 1 lb. cut would be 1 pound of shellac dissolved in a gallon an so on. Since a gallon is a large amount for most finishing tasks, you can factor down the ratio to suit your needs. For example 1/4 lb. flakes dissolved in 1 pint of alcohol will yield a 2 lb. cut. It’s best to weigh the shellac flakes – small inexpensive food portion scales calibrated in ounces are available at house ware supply stores.
Using Shellac
There are many advantages to using shellac. Low toxicity, ease of application, and ease of repair are the best reasons to use shellac. Yet, like any finish, there are some disadvantages which are mentioned below. However, some of the reasons people cite as the disadvantages of shellac are based on misconceptions. Two of the most common ones can be easily explained. The first is that it won’t dry. This problem can be avoided by using freshly dissolved shellac flakes. The second complaint against shellac is poor moisture resistance. This can be overcome by using dewaxed shellac and fresh product. Using old shellac solution will decrease its moisture resistance. You can easily prove this. Take a board that has been finished with fresh shellac and after it has fully dried (about a week), pour some water on the finish and let it sit overnight. When you come back the next morning you will still see the puddle of water, but the finish will be only slightly marred. Shellacs ability to withstand water decreases with the age of the film, so don’t try this on old finishes.
An interesting feature of shellac is that it resists water-vapor very well. In tests done by the United States Forest Products Laboratory on the moisture-excluding effectiveness of wood finishes (the ability of a finish to prevent moisture vapor from entering the cellular structure of the wood – called MEE), shellac rated above polyurethane, alkyd and phenolic varnish and cellulose-nitrate based lacquers.
Advantages
- Non-yellowing when compared to varnish and cellulose-nitrate based lacquers.
bullet Quick-drying. Many shellacked items can used the same day or shortly thereafter. - Wide variety of colors available.
- Superior adhesion — no other type finish can surpass it.
- Excellent hardness — it can be sanded and rubbed out well.
- Excellent as a sealer coat to raise the fibers of the wood for subsequent sanding. Also seals in finishing contaminants such as silicone, waxes, dirt and oils.
- Ease of repair. Because shellac re-dissolves in alcohol, scratches and other minor surface imperfections can be invisibly repaired by re-applying shellac to the damaged area. The new shellac melts into the old shellac allowing for perfect repair work.
- Ease of removal. Old and new shellac can be removed with denatured alcohol which eliminates the need for harmful and toxic strippers.
- Can be wiped on (padded), brushed or sprayed — all with good results.
- FDA approved — safe for food utensils and children’s toys.
- No unpleasant or toxic fumes.
Disadvantages
- It re-dissolves in alcohol so perfumes and strong alcoholic beverages like whiskey will mar the surface.
- Forms white rings on contact with water. This is more of a problem with shellacs that have wax and old shellac surfaces.
- Tendency to show scratches. The resistance to scratches can be improved by a simple waxing.
- Shellac has a relatively short shelf life after mixed in alcohol.
- Not resistant to alkaline compounds. Alkaline chemicals such as lye and ammonia discolors and mars shellac because of its acidic composition.
- These chemicals are frequently found in household cleaning products.
- Sensitivity to heat — shellac starts to soften at about 150 degrees F.
- Hot items can mar the surface.
Keep in mind that some of the disadvantages, like scratching and marring with alkalis, are easily repaired because of one of shellac’s great advantages — its ease of repair.
Applying Shellac
Shellac can be applied by practically any method — brushing, padding, or spraying. My favorite method is padding, which many woodworkers may not have heard of. This technique takes advantage of shellac’s rapid drying and allows the finisher to apply a finish in a much shorter time than varnish, polyurethane or oil finishes. It works best on flat surfaces, and in a nutshell, here’s how it’s done. Use a 2 lb. cut shellac and some padding cloth, which is available from finishing suppliers as trace cloth or French polishing cloth. It should be as lint-free as possible. Do not use cotton T-shirt type cloth or cheesecloth.
Cut a piece of cloth roughly 10″-12″ square. Fold it up into a pad so that there are no creases on the bottom. Pour about 1 ounce of alcohol on the cloth and work the alcohol into the cloth. Then take a squirt bottle of shellac and dispense approximately one ounce of shellac into the pad. Starting at the top of the board, bring the pad down on the surface like an airplane coming in for a landing, then lift it slowly off the board at the edge like taking off. Repeat this motion in stripes down the board. When you get to the bottom, the shellac that you put on the top will be dry enough to wipe again. Keep doing this until the surface is tacky and the pad starts to stick. Between wipes, pad the edges. The trick to this is to apply light coats of shellac by keeping the pad moist, not dripping wet. (If you can squeeze shellac from the pad it’s too wet). When finished with padding, store the pad in a jar with a tight cap and re-use it. If this is the first application on new wood, the shellac should penetrate quickly and be dry enough to scuff-sand with 320 stearated sandpaper to remove the raised fibers in about an hour. Repeat the same process as above until the pad starts to stick. Let this application dry overnight and then scuff sand with 320 grit stearated sandpaper and then steel wool with maroon synthetic steel wool or 000 regular steel-wool. Repeat the padding application one more time and let it dry overnight. Then rub the finish out with 0000 steel wool, using wax thinned with mineral spirits as a lubricant. After the wax dries to a haze, wipe the excess wax off with a soft cotton cloth. This leaves a very mellow, hand-rubbed satin finish.
This padding technique can also be used on sides, legs aprons and drawers, provided they are relatively flat, but on complex surfaces I like to use a brush. A brush can also be used on the flat surfaces as described below.
Brushing Shellac
Brushing shellac is very different from brushing oil-based finishes such as varnish or polyurethane. Part of the difficulty is that because shellac dries so fast you can’t come back later with a brush and even it out. It takes some practice but the following pointers should help.
The brush that performs the best for flowing on finish is a fitch brush. Fitch brushes used to be pure skunk hair, but some have soft badger hair on the outside to produce a smooth finish and a center of skunk hair to give the brush body. Most sold nowadays are very fine, soft china bristle dyed to resemble badger-hair. If you’ve never used an expensive brush before, you’ll quickly realize that it’s worth the price. My second choice for a shellac brush would be pure white china bristle.
A different type of brush called Golden Taklon is also a great brush for shellac application. The advantage of this synthetic bristle brush is that it can be used to apply light, quick applications of shellac. The chisel, square edge allows precise application. It’s a very good brush for complicated surfaces. Synthetic bristle also cleans easier than natural bristle.
Before brushing, dip the brush all the way to the ferrule( the metal part near the handle) into alcohol and then wring it out. This makes the brush easier to clean later.
I like to use a 1 lb. or 1-1/2 lb. cut shellac solution for brushing. This light cut minimizes brush marks which are hard to rub out later. Dip the brush about halfway into the solution and bring the brush out and let the excess shellac run off, then drag it lightly across the top of the jar or can your using. Starting about 2″ in from the edge, drag the brush lightly to the edge, then come back all the way to the other edge. Brush once and quickly come back to even out the finish if it’s uneven, but don’t work it too much. Brushing shellac doesn’t create air bubbles so these should not be a problem. Brush another coat next to the previous one, slightly overlapping it by about a 1/4 inch. Work down the board until it’s covered and then do the edges. After the shellac is dry, (1 hour for the first coat, overnight for subsequent coats), scuff sand and steel wool like the padding schedule above. Three coats should be sufficient for close-grained woods like cherry or maple, but you may want 4-5 coats on open-pored woods like mahogany. Rub the finish out with wax and steel-wool as above.
To clean brushes, you do not need to use expensive alcohol solvents. Household ammonia cleans shellac brushes because the alkaline ammonia dissolves the acidic shellac. Washing the brush with soap (I use Dawn dish-washing detergent) and water afterwards keeps the bristles soft.
Spraying Shellac
Shellac handles very much like nitrocellulose lacquer. The best cut for spraying is a 2 lb cut which is roughly a 20% solids content so it will build faster than lacquer. It may flash too quickly – especially when using a turbine, which will affect leveling of the wet film- so I usually add a retarder to the shellac. You can use butyl or isopropyl alcohol as retarders, but lacquer retarders like butyl cellosolve can also be used.
Shellac also is prone to “fat edge” where there is a discernible build up of a heavier coating around edges and sharp corners. This is caused by surface tension gradients that occur during the drying process and can be remedied by chamfering sharp corners and keeping the work away from drafts during drying. Add a wetting agent like Homestead’s Shellac-wet to eliminate this problem.
Shellac can be rubbed out like other finishes, but using a power buffer is dicey. Shellac softens at a much lower temperature than other finishes so it’s easy to burn the finish.
Repairs To Shellac Finishes
Over time, shellac finishes can show surface scratches and other minor mishaps like water rings. These are very easy to repair with alcohol, the solvent for shellac. Surface scratches can be repaired easily by flowing in a thin cut of shellac (1 lb.) into the scratch. Use a very fine artist’s brush like a #1 or #2. If the scratch has gone through the finish and the stain, you can mix the shellac with alcohol soluble dyes or pigments to match to original color. White water spots can be treated the same way, but usually only with straight alcohol. Padding or brushing a coat of shellac and then rubbing it out like above restores the finish so that it looks even. If you’re not sure whether the original finish is shellac, a simple test will confirm this. Dab some alcohol on an inconspicuous area such as behind a leg. If the finish gets tacky, it’s shellac.
If you’re not confident in your abilities for the above repair techniques, a simple cleaning with mineral spirits or naphtha, followed by a light coat of paste wax improves the look of the finish quite a bit.