
Cleaning & Waxing Old Furniture
Posted by Jewitthome on May 8, 2000 in Articles | Comments Off on Cleaning & Waxing Old FurnitureCopyright 2000 by Jeff Jewitt Not reproducible in any form, written or electronic, without permission
 Sooner or later, every woodworker is faced with the prospect of refinishing an old piece of furniture. Whether it’s a treasured “find” at a flea market or auction, or a favor for a relative or friend, etc., most people consider stripping off the old finish and refinishing the only option of successfully restoring the appearance of the piece.
When many woodworkers see an old dirty finish, their first thought is to remove it. In some cases this is the best approach as I will explain below. However, most old finishes do not need to be completely removed to restore a nice appearance. Much of the patina on old pieces is on the outer surface of the wood under the finish and is the result of exposure to sun and air. The chemicals in most strippers “pull out” some of this patina which can affect the desirable characteristics of an old piece. Strippers can also affect the glue in joints and loosen veneer. Museums and conservators of antique and historically important furniture rarely remove a finish and will only do so when the finish has degraded to the point that the stability of the piece is jeopardized. Most of the time, the finish is partially removed which involves the removal of the damaged surface layer only. Almost all techniques involve some type of cleaning and removal of accumulations of dirt, oils, and old polishes from years of use.
There are several techniques for cleaning and restoring an old finish to the point where the piece once again looks good. A background in restoration and conservation has taught me several cleaning and conservation techniques that can be used by most woodworkers to restore a piece of furniture without stripping the finish. In this article, I’ll detail several of these techniques that can be done by most woodworkers with a minimum of specialized materials. Before we start, I’d like to discuss those finishes which shouldn’t be saved.
Finishes That Can’t be Saved
Not all old finishes can be saved. Finishes that are severely damaged or degraded to the point where they can no longer effectively do a good job of protecting the wood should be removed. Although most conservators would like to save the original finish when possible, finishes that have degraded to the point where the wood is in jeopardy should be removed. These situations include severe water or heat damage, large losses of the finish where the wood is exposed and situations where the finish is severely discolored. Another finish that cannot be saved is a finish that is sticky. Sticky finishes are those that have become chemically altered to the point where they will never fully harden. Severe water or heat damage appear as large white areas where the finish is peeling or flaking off. Large exposed areas of wood are very difficult to blend in without highly developed skills so removal of the entire finish is called for. Another problem finish is one in which the finish has been mixed with pigment and applied thickly. Old varnishes and shellacs applied in this manner may develop large cracks or “islands” which show the bare wood below. This finish should be removed in most cases. An exception are crazed or cracked finishes where the cracks do not go all the way through to the wood below. I’ll explain how to deal with this later.
The goal in restoring an old finish is not to make it look brand new. At best this treatment should restore as much of the original condition as possible and prevent further deterioration. While by no means is restoring a finish a “quick-fix” type of repair, on most pieces it should be less time-consuming and expensive than a complete stripping and refinishing. In addition, you do not run the risk of ruining the value of an old piece of furniture by removing a piece of its history. The following are the steps in saving an old finish. Cleaning, abrading the old finish (if necessary) and finally waxing.
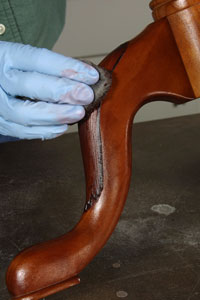
Cleaning
Cleaning is a two step process which removes both water-soluble and oil-soluble dirt and grime. The following process should not harm an old finish unless it is badly degraded. The first cleaning step uses mineral spirits or paint thinner to remove oil based dirt and old waxes and polishes. It’s important to test a small amount of the cleaner on an inconspicuous area. Certain oil-based finishes varnishes can irreversibly whiten on exposure to some hydrocarbons so testing is crucial and it’s important to know what the finish is. Oil finishes may soften and be completely removed, but in most cases mineral spirits works the best. Working in a well-ventilated area, dampen a clean cloth with the mineral spirits and rub a small surface at a time. Do not saturate the surface. Switch to clean cloths frequently.
The next step involves using a household detergent mixed with distilled water. I use Dawn, a commercial dish-washing detergent that is readily available. Use a solution of one capful in a pint of lukewarm water. Apply the solution with a dampened clean cloth, (not dripping wet) and rub a small area at a time. You’ll see your progress by the dirt on the rag, so change the surface frequently. Afterwards, wipe all the excess detergent off with a rag dampened slightly with clean water and proceed to the next step.
Sanding
The cleaning above removes the surface dirt from the finish but it still may be hazy or whitish. Part of this problem may be from small crazing or cracks in the finish which reflect light – making the surface appear dull. If this is the case and the cracks do not go all the way through to the wood, abrading part of the finish will remove most of the cracks. Use a non-clogging stearated sandpaper, (sandpaper mixed with an additive to minimize clogging), to abrade away a portion of the finish. Wearing a dust mask, start with 240 grit and proceed to 320 grit and finally 400 grit. Back the paper with a felt or cork block and avoid the edges since it’s easy to cut completely through the finish. Sand in straight lines with the finish and wipe the residue off frequently with a mineral spirits dampened rag. You can stop sanding when the grain of the wood is visible or when the cracks have disappeared. Patience is required because a heavy hand will cut through the finish and you’ll have no choice but to strip at that point. Wipe the piece with mineral spirits and let dry overnight.
Waxing
The piece is now ready for the final step. Use a good quality furniture wax like Liberon Black Bison, Behlen, or Antiquax. All these waxes come in clear but the Liberon product comes is several other shades and is useful for darker woods and in maintaining patina (it won’t leave a whitish residue in cervices, open-grain and corners). Also if you use a light wax on a dark wood any wax residue that lodges in crevices or small defects will be noticeable when dry. Put a scoop of wax inside a clean cloth and apply the wax in a small circular motion. On turned areas, carvings and other irregular areas, work the wax in with a stiff bristle brush. Work on a manageable area at a time and when the wax hazes buff it out using a clean cloth. After drying overnight, give it a second waxing.
When the second coat dries you’ll have a restored finish without the bother or hassle of stripping. You’ll find it’s much less work and the result is that you haven’t possibly detracted from the value if the piece is an antique. As an added bonus, you find that the entire process can be done in one weekend, rather than two or three weekends. And finally, the piece will have retained the patina that took so long to acquire with time. And the time you saved can be spent admiring your furniture.