
 Mission Oak Finish
© by Jeff Jewitt
Not reproducible in any form, written or electronic, without permission
We do not sell Stickley stains. The factory uses a multi-step process using proprietary dyes; oil glazes and industrial solvent spray lacquer that’s typically beyond the scope of most home finishers. An alternative method which yields excellent results is based on the steps below and can be easily done by hand. If you follow the steps below, you should have great results. A video of the complete process is here.
These finishing steps also introduce you to the technique of applying a glaze over a dyed surface. This technique allows for subtle manipulation of the overall color by choosing different glaze colors. We’ll suggest starting formulas, but feel free to experiment.
Preparation
The factory uses quarter-sawn white oak for all its Mission Furniture. If you use something different it will not look like the factory finish or the samples below. It’s not wrong to use a different wood, but keep that in mind. After completing the building process, sand the wood with 100, then 120 and then 150 grit and wipe the wood with distilled water. Sand with 180 grit when dry and remove all the dust from the pores. You can use a shop vacuum or blow the dust off with compressed air. The pores must be clean and free of all sawdust before proceeding so check the surfaces carefully.
Step One – Staining
You can leave the wood unstained if you wish, which produces the look in Sample 6. Most Stickley colors are achieved by applying dye to establish the dominate undertone of the piece. This can range anywhere from a light tan color to a dark brown. Order the TransTint wood dye color in the color you like. A 2 oz bottle makes at least 2 quarts stain. It’s important to experiment on scraps and carry the finish all the way to the end. When applying by hand, we suggest using water only to thin the concentrated TransTint. Apply the dye by flooding all surfaces and blot up the excess. Let it dry 8 hours before scuff sanding with 320 grit sandpaper followed by a light rubbing with maroon synthetic steel wool. When the piece has dried, you may notice a lighter color to the pores. This is normal when using water dyes.
Step Two – Sealing
Apply one coat of General Finishes SealACell Sealer. Let it dry 12 hours then lightly sand with 320 grit sandpaper. Be careful not to sand so hard you cut through the stain.
Step Three – Re-Staining (Glazing)
One of the qualities that make quarter sawn white oak attractive is its distinctive pore structure. By emphasizing these pores with a dark glaze, the true Mission effect is achieved. Use the gel stain as noted in the instructions for each sample.
Apply the glaze with a stiff bristle brush, working it across the grain to make sure it gets into the pores. Wipe the excess off with a dry rag. If the color is too dark, or it dries quickly, apply some mineral spirits to the rag to help remove the stain. Thinning the product with some mineral spirits or boiled linseed oil (about 3 tablespoons boiled linseed oil per cup of stain) will extend the working time. Let the stain dry at least 24 -48 hours. To check if the stain is dry enough to topcoat, wipe it with a dry cloth. No stain should come off,
Step Four – Finish
A mission finish on oak looks best with as little finish as possible, and it should not be glossy, but tastes vary so that’s up to you. I like at least two coats of General Finishes ArmRSeal Satin Finish – applied with a soft cloth.
Supplies Links at the end of the Article
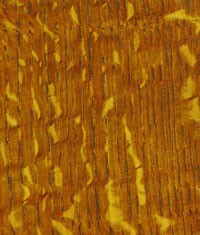
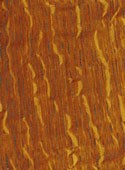
 Sample 1. (Similar to “Fayetteville” Finish)
Stain with TransTint Dark Vintage Maple diluted at 1 oz dye to 2 qt. water
Apply one coat General Finishes SealACell Sealer. Let dry one day and scuff sand with 320 grit
Apply General Finishes Antique Walnut Gel Stain. Wipe clean and let dry overnight.
Apply 2 coats General Finishes ArmRSeal Satin Finish.
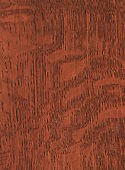 Sample 2.
Stain with TransTint Reddish Brown * diluted at 1 oz dye to 1 qt. water
Apply one coat SealACell Sealer. Let dry one day and scuff sand with 320 grit
Apply General Finishes Georgian Cherry Gel Stain. Wipe clean and let dry overnight.
Apply 2 coats ArmRSeal Satin Finish.
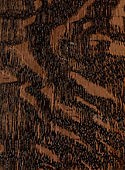 Sample 3. (Similar to “Centennial” Finish)
Stain with TransTint Dark Mission Brown diluted at 1 oz dye to 1 qt. water
Apply one coat General Finishes SealACell Sealer. Let dry one day and scuff sand with 320 grit
Apply General Finishes Java Gel Stain. Wipe clean and let dry overnight.
Apply 2 coats General Finishes ArmRSeal Satin Finish.
* To produce the “Oak Park” color, use Dark Mission Brown mixed at the ratio of 1 oz dye to 2 qt water. Use General Finishes Brown Mahogany Gel Stain.
 Sample 4
Stain with TransTint Brown Mahogany diluted at 1 oz dye to 2 qt.* water
Apply one coat General Finishes SealACell Sealer. Let dry one day and scuff sand with 320 grit
Apply General Finishes Candlelite Gel Stain. Wipe clean and let dry overnight.
Apply 2 coats General Finishes ArmRSeal Satin Finish.
* 1 oz to 1 qt water produces color similar to “Onondaga” Finish
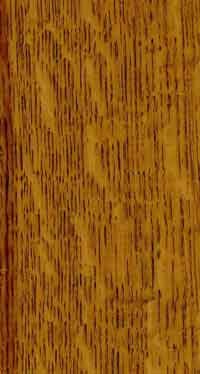
 Sample 5. (Similar to “Aurora” Finish)
Stain with TransTint Medium Brown diluted at 1 oz dye to 1 qt. water
Apply one coat General Finishes SealACell Sealer. Let dry one day and scuff sand with 320 grit
Apply General Finishes Antique Walnut Gel Stain. Wipe clean and let dry overnight.
Apply 2 coats General Finishes ArmRSeal Satin Finish.
 Sample 6.
Apply one coat General Finishes SealACell Sealer to the unstained wood. Let dry one day and scuff sand with 320 grit
Apply General Finishes American Oak Gel Stain. Wipe clean and let dry overnight.
Apply 2 coats General Finishes ArmRSeal Satin Finish.
Note: Skip the Walnut Gel Stain and it’s close to the “Limestone” finish
The finishing products used above and samples are not the products used by the Stickley factory. The use of the Stickley Finish names is used with the permission of L. & J.G. Stickley Inc.
The products mentioned in this guide can be ordered from the following sellers:
Seal-A-Cell – Sealer from Woodcraft